Testing your pool water is the key to keeping it balanced, safe, and clear.
Without accurate testing, you will not know what the chemistry levels are in the water or what chemicals need to be added.
Even if the pool looks clean, problems like algae and poor water balance can already be developing.
How To Test Your Pool Water
Testing the pool is simple once you have a good water sample. The basic process is always the same, it’s just a matter of how you test.
- Get a clean water sample. Collect pool water from elbow depth in the deep end away from skimmers and return jets.
- Choose your testing method. You can test with a liquid test kit, test strips, or by taking the sample to the pool store.
- Note: A testing kit is the most accurate and reliable!
- Test the main chemistry levels. The chemistry parameters you want to test are free chlorine (FC), combined chlorine (CC), pH, total alkalinity (TA), calcium hardness (CH), and cyanuric acid (CYA). If you have a saltwater pool, test salt levels as well.
After testing your parameters, use the correct pool chemicals to raise or lower the levels that are out of range.
Test again to confirm the pool is getting back into balance!
Getting a Water Sample
The most important item for pool water testing is…water! A good sample will ensure the most accurate portrait of your current water readings.
- Gather the sample using a clean bottle, cup, or glass jar.
- Find an area in the pool’s deep end away from skimmers or return jets. You want to find a spot that doesn’t get too disturbed by movement.
- Insert the cup face down in the water about elbow deep. You don’t want water to get in it yet, so create an air gap until you reach the elbow. This ensures that the water taken isn’t skimmed from the top but rather a few feet below the surface.
- Turn the cup over until the cup fills. You’ll notice air bubbles release when the cup starts to fill. You now have your sample!
The cup or bottle should be big enough to hold as much water as your testing mechanism requires. When taking it to a pool store, grab a lid so it doesn’t spill!
Choosing Your Method of Pool Testing
As mentioned, the three basic ways to test are with a testing kit, strips, or taking a sample to the pool store. They
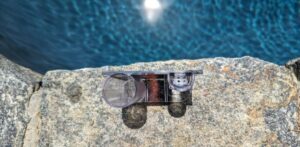
Pool test kits typically use a test tube and reagents in dropper bottles. While the upfront cost of the kit and the seasonal reordering of reagents might seem like a lot, it is by far and away the best and most accurate way to test your pool.

The most accurate and reliable pool testing kit.
Type of Chlorine Test: FAS-DPD
Read our full Taylor K-2006 Review.
It can save you money in the long run by its accuracy and using the proper amount of chemicals during your swimming season. Using test kits may require a bit of a learning curve, but it becomes fairly simple once you test a few times. To test using a kit:
- Fill the test tube that is provided in your test kit with the water sample that was taken. Make sure you fill to the recommended level.
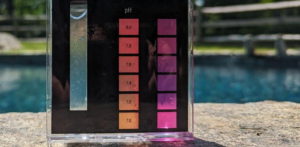
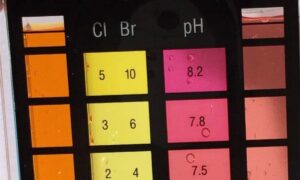
- Use the numbered reagents for each test. Depending on the test kit used, it could be titration-based (sample changes from one color to another) or color-coded (sample turns to a color shade that needs to be compared to a key provided in the kit).
- Follow the tests’ directions and pour each reagent into the test tube one drip at a time, counting each drop.
- Record the number of drops when the color changes according to the tested parameter.
- Most tests will convert you to a number read in parts per million (ppm).
Refer to your test kit manual for a full set of instructions.
Testing with a kit can be more time-consuming than testing with strips, but there are options to speed it up. Taylor-branded kits can use a SpeedStir that swirls reagent drops for you, which can literally cut testing time in half!
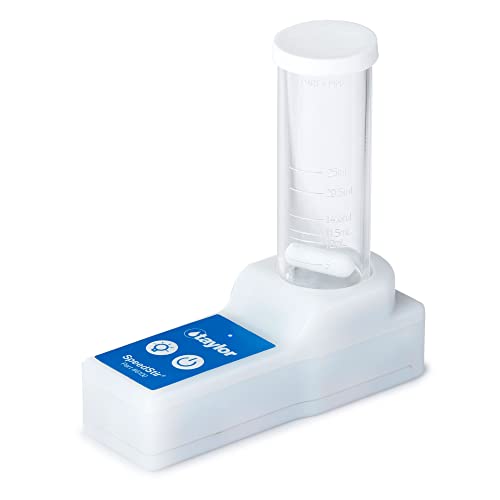
Speed up your testing when using Taylor Technologies pool tests.
You should be recording every test taken to understand how your pool behaves over the days and weeks of a season. It’s as easy as keeping a log or using an app to store your tests.
Test Strips
Strips are a quick and inexpensive way to test the water. They are also super simple to use! Most strips will have most of the necessary chemical levels needed to test.
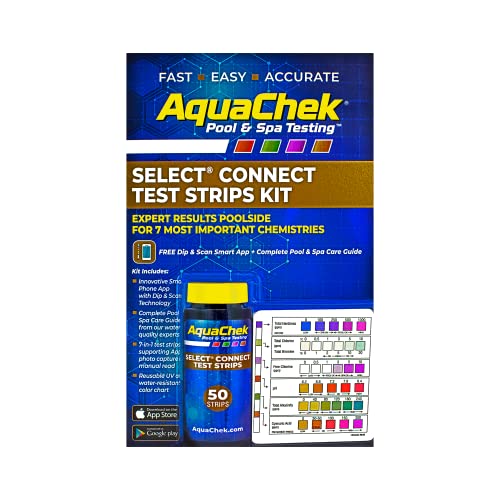
However, they are not very accurate and often give ranges rather than precise numbers. Also, they cannot measure all parameters, like calcium hardness (CH). Most measure total hardness, which is calcium and magnesium combined.
That is why it is recommended to supplement test strips with a liquid test kit.
Most strips follow the same general steps:
- Dip a test strip into your water sample. Remove almost immediately after dipping.
- Wait about 15 seconds without any excessive shaking or movement.
- Compare the test strip to the number or color range on the label of the test box or holder.
Refer to your test strip for the full instructions and the ranges.
Taking Samples to a Pool Store
If you do not have a kit or strips handy and need to test your pool’s water, you can take it to your local pool store and get a readout.
Most stores will test your water for free, and they can usually provide more than home testing kits can. In fact, when testing for metals, it is recommended to use a pool store, as tests can be expensive.
They also often give a printout with the chemistry levels and what chemicals to use.
But understand that a pool store’s ultimate goal is to sell you products, and many chemicals aren’t necessary. You could walk out of that store with $100s worth of chemicals that won’t help and may even hurt your water balance.
Testing on your own with a testing kit will provide the most accurate and reliable results.
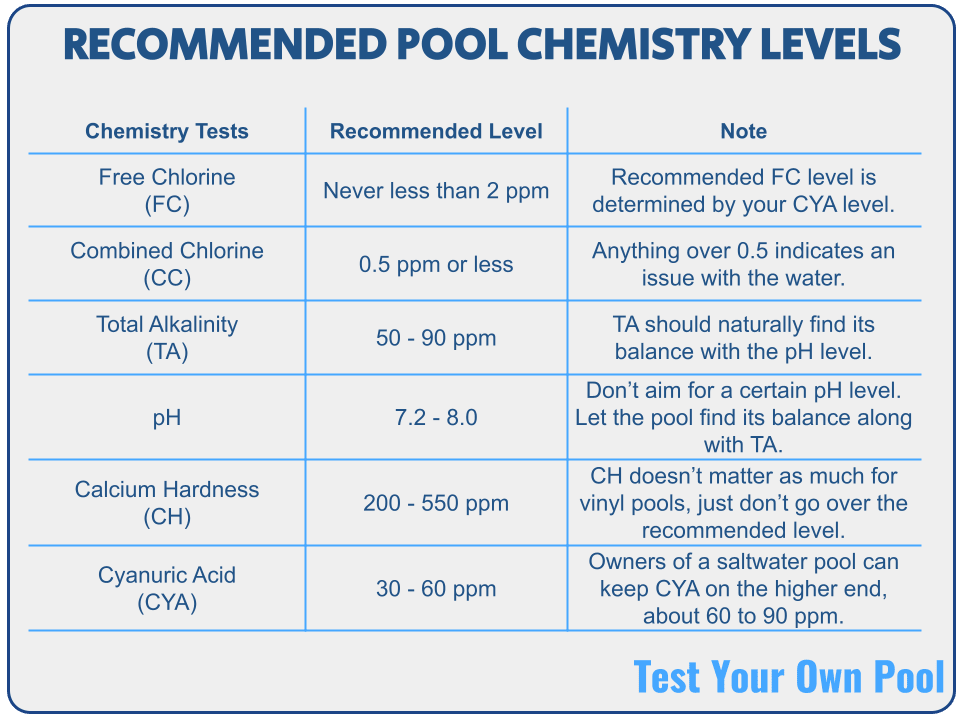
Pool Water Basic Chemistry: What to Test For
Here are the key chemistry parameters we will want to test and continuously monitor.
Depending on the test results, you’ll need the proper pool chemicals to keep your water balanced or fix any issues that have been revealed.
Free Chlorine (FC)
Free chlorine measures the amount of sanitizer or chlorine in your pool. It is the most effective way to combat algae and other germs floating in your pool water. Many different types of chlorine can help sanitize your pool. How much chlorine to add largely depends on your CYA level.
Free chlorine can be tested in multiple ways. Chlorine testing may vary depending on what type of kit is being used.
Cyanuric Acid (CYA)
CYA is a chlorine stabilizer or “protector.” It helps block the sun’s UV rays from degrading your chlorine too quickly. Think about it as putting on sunscreen to protect yourself from the sun.
It’s important to keep your CYA at its appropriate recommended level. Too much will force you to use more chlorine to be effective. But too little will burn your chlorine at a faster pace.
pH
pH measures the acidity or basicity of your pool water. pH should be closely monitored as levels drift over time due to aeration (jets, splashing, and waterfalls/fountains can contribute to increasing pH).
Total Alkalinity (TA)
Like the CYA/chlorine relationship, total alkalinity acts as pH’s buffer or protector. Too much TA will cause the pH to drift up. Too little TA will make pH unstable to swing around at wild numbers.
Calcium Hardness (CH)
Calcium hardness shows much calcium is in your water. This is especially important for owners of plaster and gunite pools and pools with tile lines.
Lower CH levels force the water to dissolve calcium from the plaster surface, stone, and tile grout.
Combined Chlorine (CC)
Combined chlorine looks at the reaction of chlorine and any biological or organic material (the bad stuff) in your pool’s water. If you are familiar with that gross smell of chlorine when you get near a pool, that is likely a problem with a pool with a high CC.
Salt
Mostly used with pools that have a saltwater chlorine generator (SWG), you can measure how much salt is in your pool.
Recommended Chemistry Levels
Depending on what type of surface your pool has will determine the recommended chemical levels.
The pool’s size will also change how much chemicals need to be added.
Here is a chart that shows what FC levels should be based on your CYA.

How Often to Test Pool Water
How often should you be testing the pool? Testing varies on current needs. You should test total alkalinity and pH more frequently to fight a soaring pH. Generally speaking, pool water testing should be done at least weekly so you have a good idea of how your pool behaves throughout the season.
However, it is recommended to test chlorine levels daily, if not every other day. Depending on what type of chlorine you use, the sun will eat it up fairly quickly, depleting free chlorine (FC) almost daily regardless of CYA levels.
Testing daily will ensure FC levels are well balanced and there is no environment for algae to bloom.
Adding the Right Chemicals After Testing
After testing the water and understanding the results, you should put in the recommended chemicals to lower or increase each parameter based on your needs.
It may seem like a mundane process to have to test somewhat frequently, but it will undoubtedly save you the headaches and frustrations of not fighting algae every other week.